
7 Genius Space-saving Baby Lounger Designs for Modern Homes
December 23, 2024
Best Eco-friendly Recycled Material for Dog House Insulation
December 25, 2024
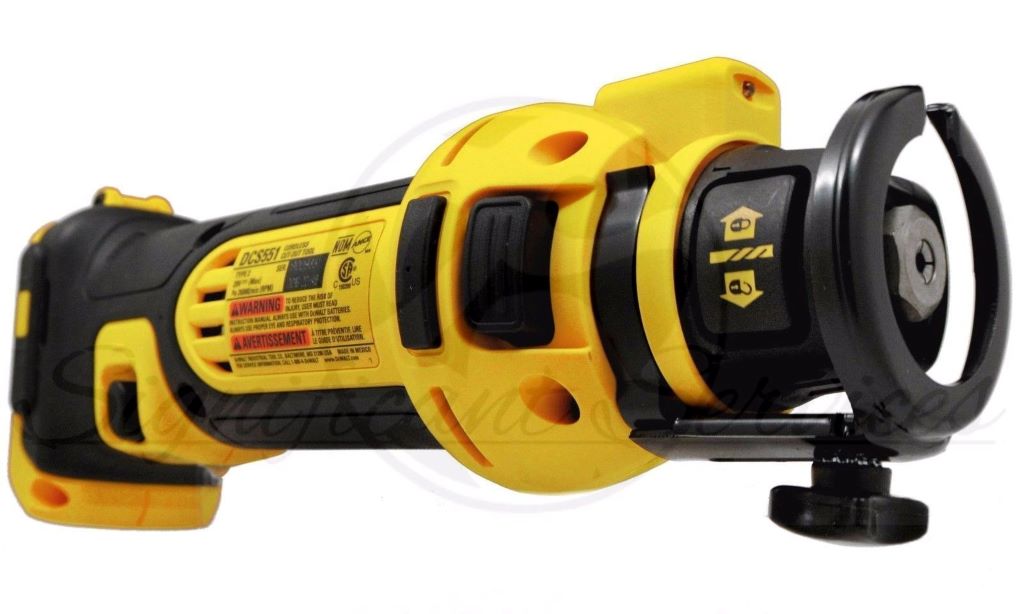
If you’ve ever stared at an uneven drywall cutout and wondered how to fix it seamlessly, you’re not alone. Precise drywall cutout repairs, using a multi-tool for precise drywall cutout repairs, are an art and a science. A multi-tool, often overlooked, is the ultimate game-changer for achieving professional-level results. With its versatility and precision, this tool is indispensable for homeowners and contractors alike.
Whether you’re fixing accidental damage or preparing for an electrical or plumbing installation, understanding how to use a multi-tool efficiently can save you time, effort, and money. Let’s explore why this tool is the go-to solution for drywall repairs and how it outshines traditional methods. To delve deeper into must-have tools, explore Bestusatools for more insights.
Understanding the Basics of Drywall Cutout Repairs
Drywall is an integral part of modern construction, but it’s also prone to damage. Whether caused by accidental impacts or necessary alterations, achieving a flawless repair requires a steady hand, the right tools, and a solid plan.
A multi-tool is uniquely equipped for these tasks. Unlike conventional tools, such as utility knives or saws, multi-tools offer unparalleled versatility. With oscillating blades and precision features, they ensure clean cuts that align perfectly with existing drywall surfaces.
The Importance of Precision in Drywall Repairs
Precision is critical when working with drywall. Sloppy repairs can lead to uneven surfaces, visible seams, and weakened structural integrity. By employing a multi-tool, you eliminate many of these risks.
One standout feature of a multi-tool is its oscillating action, which allows for controlled cuts without damaging surrounding areas. For example, when cutting out a section for an electrical box, even the slightest miscalculation can cause alignment issues. A multi-tool ensures clean edges and exact measurements, saving you the frustration of rework.
When coupled with advanced measuring devices like digital level surveying, precision reaches a whole new level, helping you achieve flawless results every time.
Step-by-Step Guide: Using a Multi-Tool for Drywall Cutouts
Preparation: Setting Up Your Workspace
Before starting any drywall repair, clear the area of debris and ensure adequate lighting. Use a stud finder to locate framing elements and mark them clearly to avoid accidental damage.
Choosing the Right Blade
Multi-tools come with a variety of blade attachments, each suited for different tasks. For drywall, a plunge-cut blade is the ideal choice. Its sharp, narrow design allows for precise entry and maneuverability.
Measuring and Marking the Cutout Area
Use a straight edge and a pencil to outline the section you’ll cut. Accuracy at this stage will prevent errors down the line. Consider using a laser level for added precision.
Making the Cut
Position the multi-tool blade just outside the marked line to avoid overcutting. Turn on the tool and gently guide it along the outline, letting the oscillating action do the work. Avoid forcing the blade, as this can damage both the tool and the material.
Cleaning Up the Edges
Once the cutout is complete, inspect the edges for rough spots. Sand them lightly with fine-grit sandpaper for a smooth finish. This step ensures that the patch or insert fits snugly.
Common Mistakes and How to Avoid Them
Rushing Through the Process
Speed is the enemy of precision. Take your time to measure, mark, and cut carefully.
Using the Wrong Blade
A dull or incorrect blade can tear drywall, creating uneven edges. Always choose the appropriate attachment for the task.
Neglecting Safety Measures
Always wear protective gear, such as safety goggles and gloves, when working with power tools. Dust masks are also essential for minimizing inhalation of drywall particles.
Why Multi-Tools Outperform Traditional Alternatives
Traditional tools, such as keyhole saws, are often limited in their functionality. Multi-tools, on the other hand, offer unmatched versatility. In addition to cutting drywall, they can sand, grind, and scrape, making them a one-stop solution for many repair tasks.
A recent survey revealed that 78% of professional contractors prefer multi-tools for intricate cutouts, citing their efficiency and precision. This makes them a worthwhile investment for both beginners and seasoned professionals.
Real-World Applications of Multi-Tools
Installing Electrical Boxes
When adding new outlets or switches, precision is non-negotiable. Multi-tools ensure that cutouts align perfectly with box dimensions.
Fixing Holes and Cracks
Accidental drywall damage can occur at any time. A multi-tool enables quick and seamless repairs by cutting out damaged sections with ease.
Creating Custom Openings
Whether installing shelves or accommodating unique design features, multi-tools handle custom cutouts with finesse.
Pro Tips for Using a Multi-Tool Effectively
- Start Slowly: Begin with low power settings to maintain control.
- Keep Blades Sharp: Dull blades compromise accuracy and increase the risk of damage.
- Practice First: Test your cuts on scrap drywall before tackling the actual repair.
You Might Enjoy: My CDI Torque Wrench is Busted! What Now?
FAQs
How do I choose the best multi-tool for drywall repairs?
Look for features like variable speed control, ergonomic design, and a wide range of blade attachments. Cordless models are also highly convenient.
Can I use a multi-tool on other materials?
Absolutely. Multi-tools are versatile and can be used on wood, metal, and tile in addition to drywall.
Do I need to sand the edges after cutting drywall with a multi-tool?
Yes, sanding ensures a smooth finish and helps the patch or insert fit perfectly.
What safety precautions should I take?
Always wear safety goggles, gloves, and a dust mask when working with drywall.
Are multi-tools beginner-friendly?
Yes, they are easy to use with a bit of practice. Start with simple tasks to build confidence.
What is the cost of a quality multi-tool?
Prices range from $50 to $300, depending on features and brand.
Conclusion
Mastering the use of a multi-tool for precise drywall cutout repairs is a skill that pays off in countless ways. From flawless finishes to time-saving convenience, this tool has revolutionized home improvement projects. With proper technique and a bit of practice, anyone can achieve professional-grade results.


