
Lightweight BMX Bikes: The Key to Effortless Maneuvers
September 24, 2023
Making the most of the local community
September 28, 2023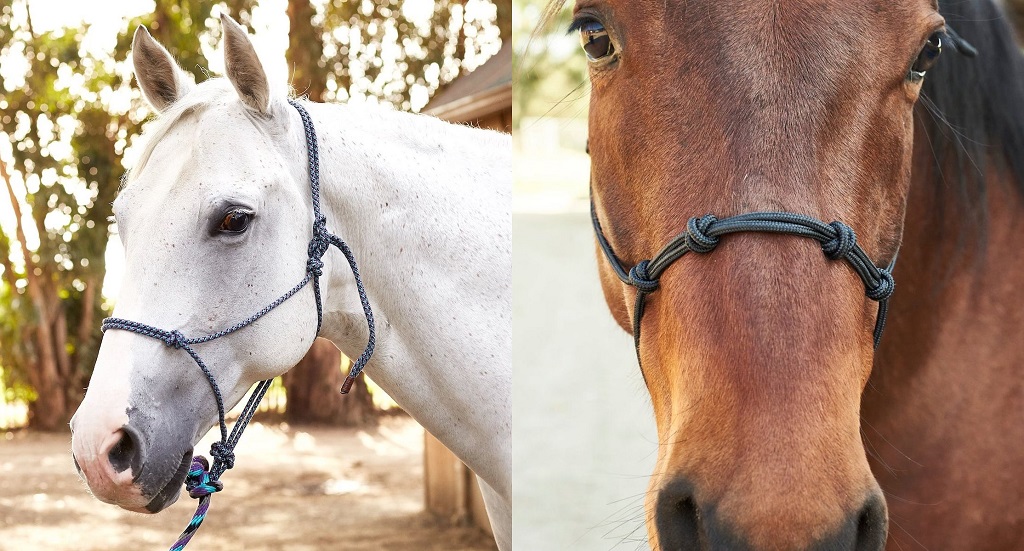
Hey there, fellow equestrian enthusiasts! So, you’ve got yourself a beautiful horse and a brand new rope halter, but you’re not quite sure how to put them together? Don’t worry; I’ve got your back! Tying a rope halter might seem like a daunting task, especially if you’re new to it, but I promise you, it’s not as complicated as it looks.
In this comprehensive guide, I’ll walk you through the process step by step, sharing tips, tricks, and some horse wisdom along the way. By the end of this, you’ll be a rope halter-tying pro, ready to hit the stables with confidence. So, let’s giddy up and get started!
What You’ll Need
Before we dive into the art of tying a rope halter, let’s gather the tools you’ll need. To ensure a smooth and safe experience for both you and your horse, it’s crucial to be well-prepared when buying rope. Here’s what you’ll need:
- A Rope Halter: This is the star of the show. Make sure it’s the right size for your horse – not too tight, not too loose. A well-fitting halter ensures comfort and control.
- A Lead Rope: You’ll need this to attach to the halter once it’s tied. Make sure it’s long enough to give you some space from your horse.
- A Quiet and Safe Space: Find a calm, quiet place to work with your horse. Safety first, always!
Now that you’ve got your tools lined up let’s move on to the actual process of tying a rope halter.
Step 1: Understand the Basics
Before we jump into the knot-tying action, let’s get familiar with the different parts of the rope halter. This will help you better understand how it works and why it’s so effective.
- Noseband: This is the part that goes over your horse’s nose, just like a regular halter.
- Throatlatch: It’s the piece that runs under your horse’s throat and attaches to the noseband.
- Crownpiece: This part goes over your horse’s head behind the ears.
- Knots and Loops: Rope halters have various knots and loops that serve different purposes. Don’t worry; we’ll go over each of them. Discover Three Tips to Keep Farm Workers Safe.
Step 2: Start with the Crownpiece
Imagine you’re putting a crown on your horse’s head – that’s exactly where you’re going to start. Here’s how:
- Stand on the left side of your horse, facing the same direction.
- Hold the halter with the noseband in your right hand and the crownpiece in your left hand.
- Reach over your horse’s head with your left hand, bringing the crownpiece around behind the ears.
- Cross the crownpiece over the noseband.
- Thread the crownpiece through the loop you’ve created.
- Pull it tight but not too snug. You want your horse to be comfortable.
Step 3: Adjust the Throatlatch
Now, let’s make sure the throatlatch is correctly positioned. It should be snug but not too tight. Here’s what you do:
- Reach under your horse’s neck with your left hand.
- Grab the throatlatch and pull it up towards the chin.
- You should be able to comfortably fit two fingers between the throatlatch and your horse’s throat.
- Adjust the length by pulling on the throatlatch or releasing some slack as needed.
Step 4: Secure the Knots
Now, we’re getting into the nitty-gritty of tying a rope halter. There are a couple of knots and loops to secure, so follow along carefully:
- Hold the noseband and the throatlatch in your left hand, and the lead rope in your right hand.
- With your right hand, form a loop with the lead rope.
- Pass the loop over the noseband and under the throatlatch.
- Pull the loop tight, so it snugly rests against the throatlatch.
- Now, let’s secure this loop by making a knot. Take the end of the lead rope and pass it through the loop you just made.
- Pull the end of the lead rope tight to create a knot.
- Make sure the knot is secure but not too tight. You should be able to easily slip a finger between the rope and your horse’s chin.
Step 5: Adjust and Double-check
At this point, your rope halter is mostly tied, but it’s crucial to make those final adjustments to ensure your horse’s comfort and safety:
- Check the fit of the noseband. It should sit comfortably on your horse’s nose without being too tight.
- Double-check the throatlatch – it should still allow you to fit two fingers comfortably between it and your horse’s throat.
- Ensure all knots are secure but not overly tight. You want your horse to be able to move and breathe freely.
Step 6: Attach the Lead Rope
Congratulations! You’ve successfully tied a rope halter on your horse. Now, it’s time to connect the lead rope to the halter:
- Find the metal or snap end of your lead rope.
- Attach it to the loop on the noseband of the halter.
- Make sure it’s securely fastened, so it won’t come undone when you’re leading your horse.
Step 7: Test the Fit
Before you start working with your horse, give the halter a gentle tug and ensure it’s properly secured. Your horse should feel comfortable and not restricted in any way. If everything looks good, you’re ready to go!
Step 8: Practice Makes Perfect
Like any skill, tying a rope halter gets easier with practice. Don’t be discouraged if it takes a few tries to get it just right. Soon, you’ll be able to do it with your eyes closed (not literally, though – safety first!).
Conclusion
So, there you have it, my fellow horse enthusiasts! Tying a rope halter might seem a bit intimidating at first, but with practice and patience, you’ll become a pro in no time. Remember, it’s not just about knowing how to do it; it’s also about understanding your horse’s comfort and safety. So, go ahead, try it out, and enjoy the wonderful world of horsemanship!
FAQs
How tight should the rope halter be on my horse’s nose?
The noseband of the rope halter should be snug but not too tight. It should sit comfortably on your horse’s nose without causing any pressure points or discomfort. You should be able to fit two fingers between the rope and your horse’s nose.
Can I use a rope halter for training my horse?
Absolutely! Rope halters are commonly used for training and groundwork with horses. They provide clear communication and are often preferred for their lightweight and simple design. Just remember to use it with care and respect for your horse.
Is it okay to leave a rope halter on my horse all the time?
While some people do leave rope halters on their horses for extended periods, it’s generally not recommended. Rope halters are designed for training and handling, not for continuous wear. It’s essential to regularly check your horse’s halter for fit and comfort and give your horse breaks from wearing it.
Can I tie my horse with a rope halter?
Yes, you can tie your horse with a rope halter, but it’s crucial to do so correctly and safely. Make sure your knots are secure, and never tie your horse in a way that could put them at risk of injury. Always use a quick-release knot or snap for added safety.
How do I clean and maintain a rope halter?
Rope halters can get dirty over time, especially if used regularly. To clean them, you can soak the halter in a bucket of warm, soapy water and then rinse it thoroughly. Hang it to dry in a well-ventilated area. Check the condition of your halter regularly, and if you notice any fraying or damage, it’s best to replace it for safety reasons.

